
I like the blue striped ticking better than the red & gold vinyl…

The sad, dilapidated state of Myrtle’s 46 year old upholstery.
I had no intention whatsoever of taking on the re-upholstery job of Myrtle’s dinette cushions myself. It was obvious that something would have to be done with the cushions; the original red vinyl and underlying striped ticking were ripped and smelly, and fugly to boot, but I do not sew, thus I planned to outsource the job to the local upholstery shop. Shopping around for the best upholstery quote wasn’t an option, either –we only have the one shop in my small town.
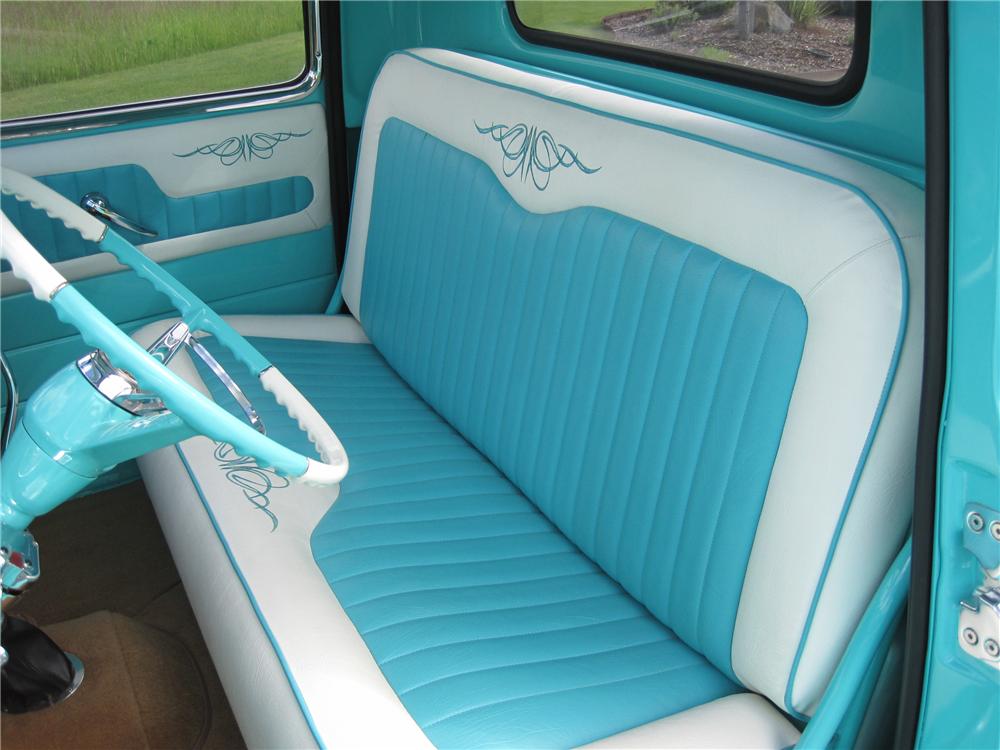
Classic seats like the one in this 1956 Chevy were the inspiration for my original plan. I had in mind turquoise vinyl cushions, with a large white vinyl chevron on the back of each, and tangerine colored vinyl piping.
I created a plan for the dinette cushions and sketched it out along with measurements of what I would need (I assumed I would want to purchase all new foam, as the current foam was really, well, old ). For the design scheme, I was envisioning turquoise vinyl with a white chevron pattern, a’la 1950’s classic car style.
Armed with my sketches, I went to visit the upholstery shop, where interesting things were learned. First off, I became enlightened as to how the rising costs of crude oil have caused an accompanying astronomical price climb in petroleum based products… like camper cushion foam. If I wanted all new foam at the current dimensions of Myrtle’s cushions, I’d be looking at $1000.00 minimum –for the foam alone! I quickly realized how perfectly usable the nearly priceless foam I already possessed was; I could figure out a way to clean it up, and besides, it would be totally encased in vinyl.

I chose Naugahyde vinyl in “Ocean” and “Marmalade” shades.
Ahhh, the vinyl. So many choices. But I knew the one for me as soon as I saw it. Classic Naugahyde vinyl –what could be more vintage than that? And it was soooo soft. It was one of the cheapest options, too, so a win-win!
The upholstery lady promised a quote, based on my dimensions, the chosen vinyl, and the fact that I would be supplying my own foam, within a week. I proceeded to head home and begin the process of cleaning 46 year old foam cushions.

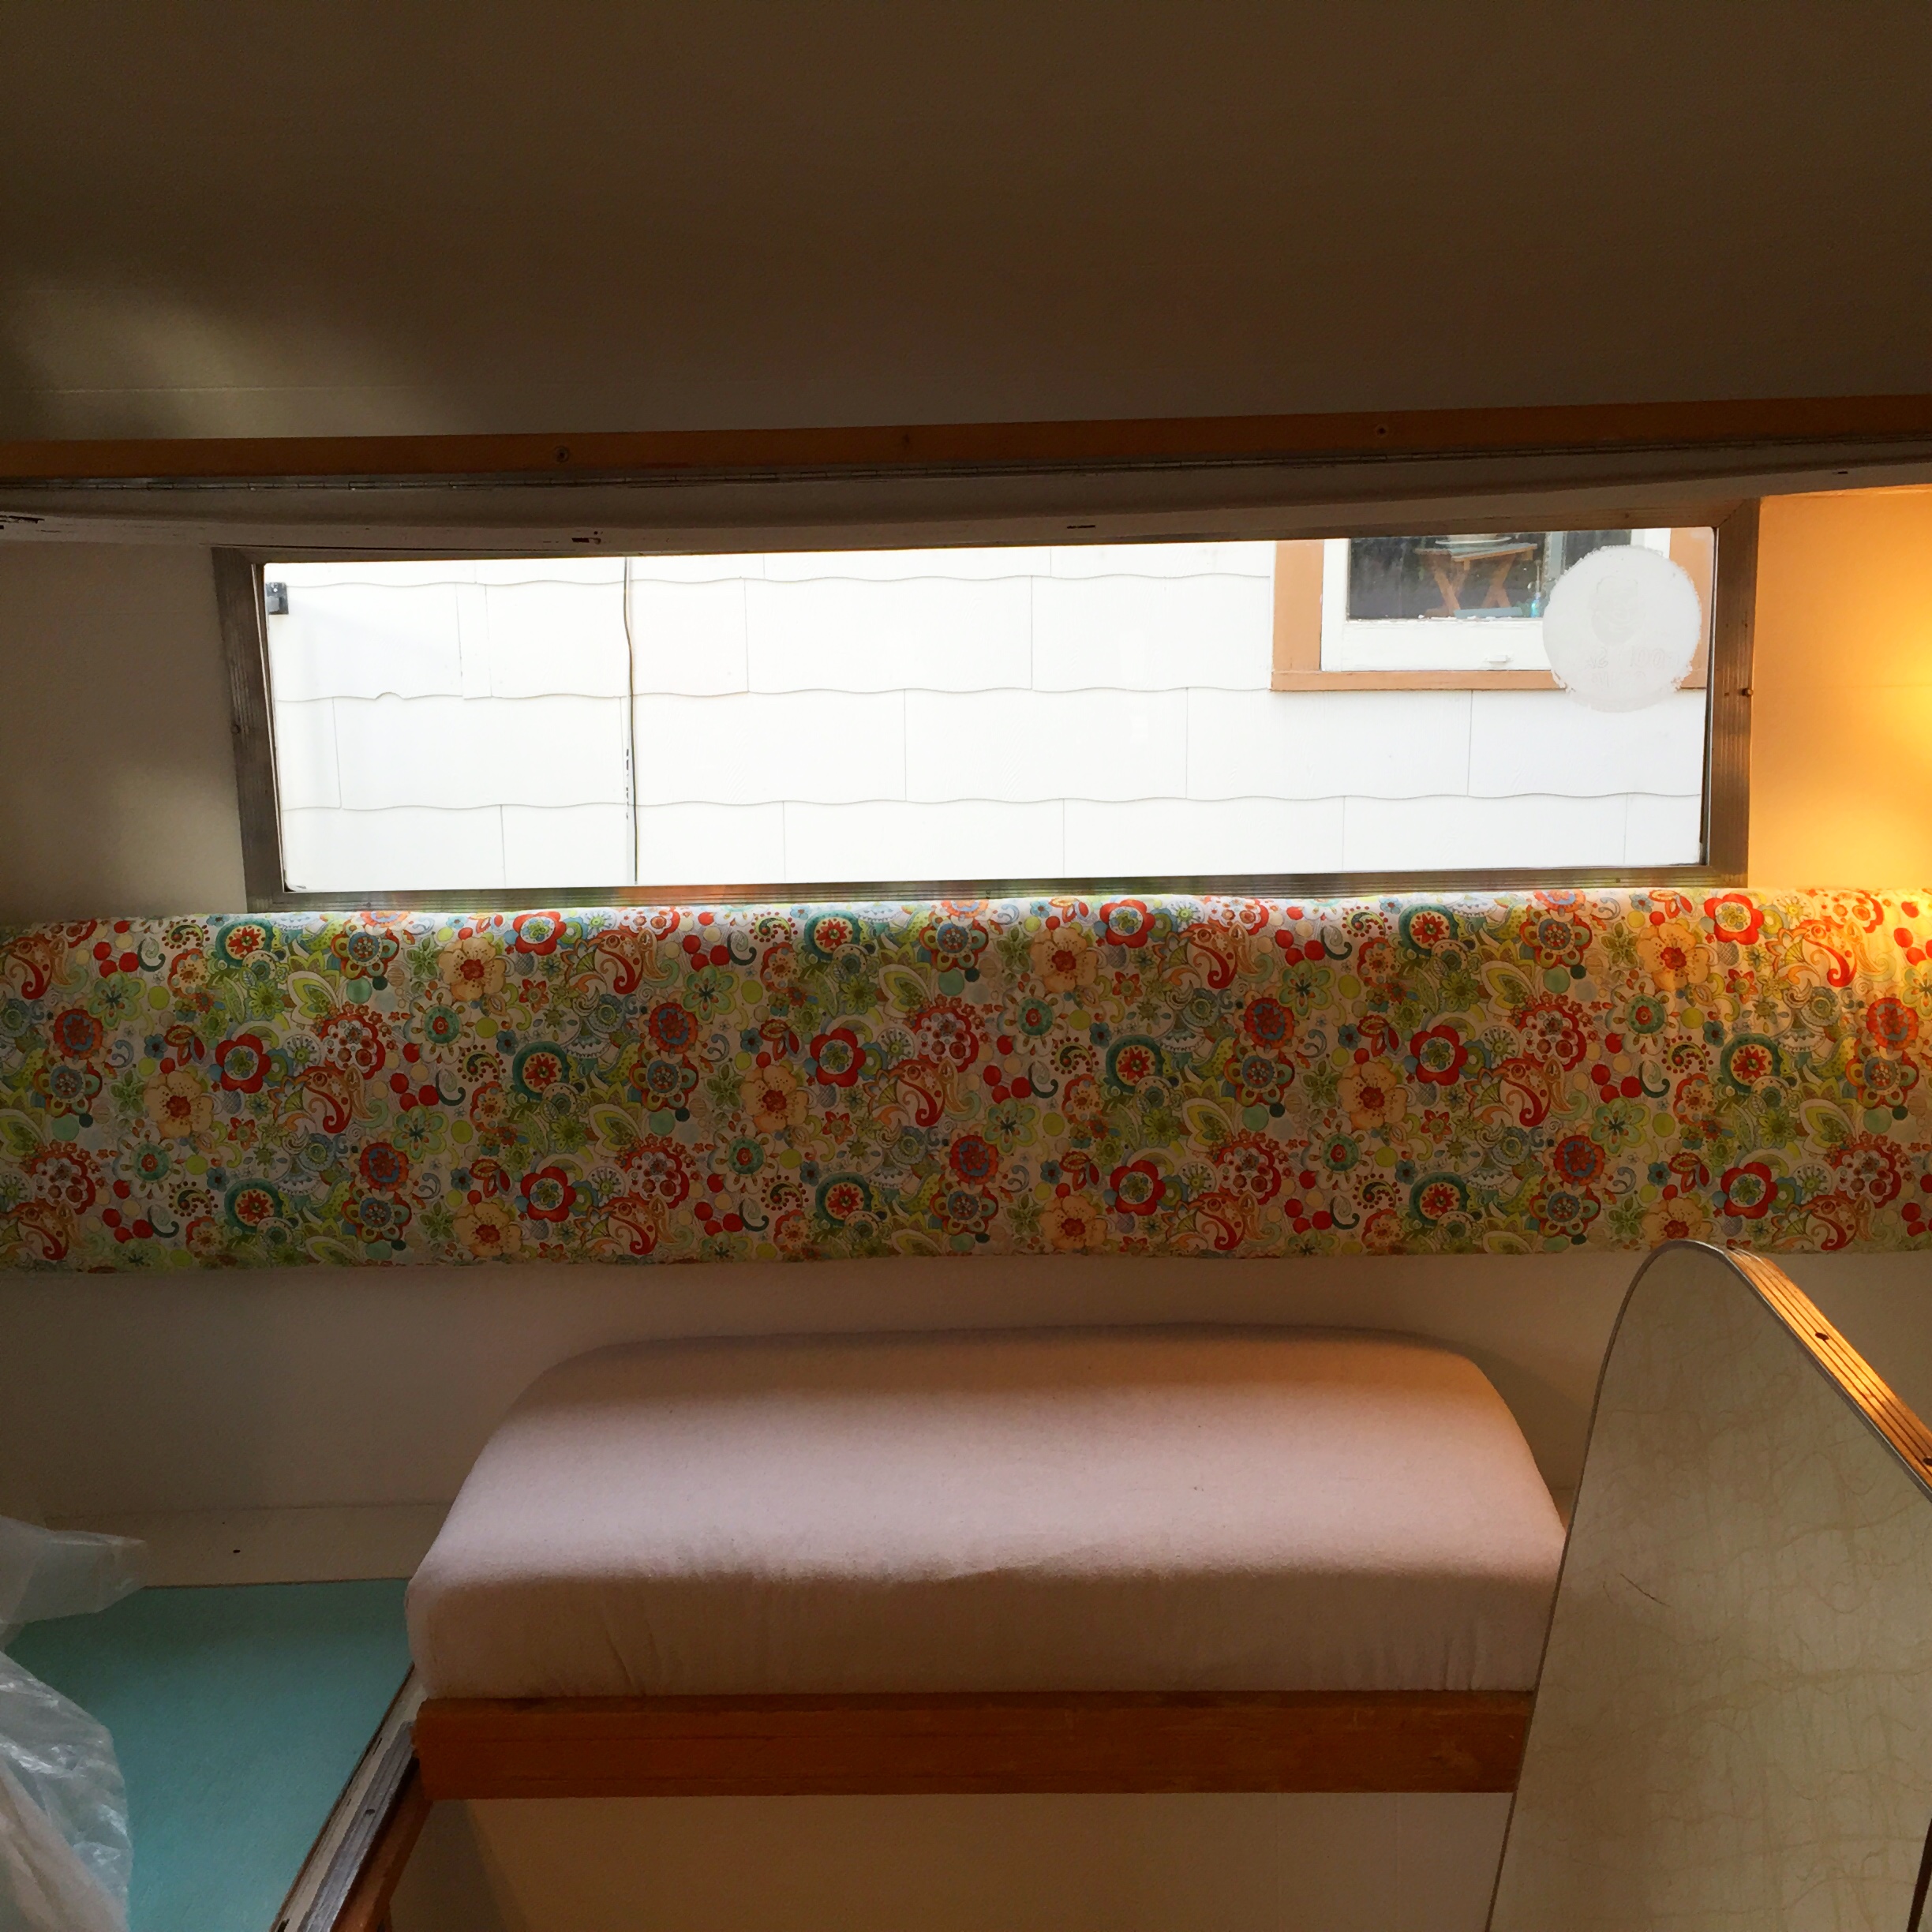
Most of the foam was still in decent shape, though in a few places, water leaks had caused staining as seen here.
I did all kinds of things with these cushions. I covered them in baking soda and let them sit in bags for 48 hours to draw out the musty odor, then attacked them with a shop vac to draw out all the baking powder. I Lysoled the shit out of them in a quest to kill any 46 year old germs. Then the shop vac again. I laid them out in my yard, hosed them down, poured detergent on them, and jumped all over them to work the sudsy soap in. Then hosed all the soap out. This followed by a week of flipping and drying in the sun, and more shop vac action. Febreeze, shop vac, repeat. Luckily, I had all kinds of time, as the upholstery shop had yet to call me with my quote. When the cushions were dry and as clean as I could make them, I loaded them all into my PT Cruiser, assuming the upholsterer would be calling any time –might as well be ready to deliver them –plus I had nowhere to put them in the house, and Myrtle was in active renovation by this time –no place for clean(ish) foam cushions to be!
I drove around with those massive cushions filling up every spare cubicle of space in my car, including most of the space where my head should go, for another 5 days or so (not gonna lie, on really hot days it smelled a lot like old, vintage camper in my car) before finally calling the shop myself to inquire as to my quote. The upholsterer apologized for the delay and told me she was not quite ready with it, she still had to figure in some further labor costs, and the piping, or something like that –I forget now –but she let me know that currently the quote was at about $2,200.00.
Just let that number sink in.
Twenty-two hundred dollars. And climbing.
She assured me she would call me the next morning with a firm number.
Well, she never did call back, not even to this day, but it hardly matters as there has never, not ever, been any chance that I would pay over $2000.00 to have vinyl cushions in my vintage travel trailer. The whole damn trailer only cost $900.00! True, I thought the cushions were going to be the one splurge item, but I thought that splurge would set me back, like, $700.00 tops. Obviously, I was woefully ignorant as to the costs of upholstery labor.
So, there I was, an ignorant non-sewer, with the need to fashion material around spongy, somewhat square objects, and to secure that material without resorting to thread, or a sewing machine. Why, I wondered, couldn’t it be easy, like, say, covering the seat on an old chair or something, where you can just staple gun the damn fabric to the underside of the wooden chair? And then I realized that it could be, it could be that easy(!) –all I had to do was put some wood on the back or bottoms of the foam cushions!
If I were a better blogger, I would have a step-by-step pictorial explanation here of how that process worked, but really, I wasn’t doing rocket science; it probably took me longer to pick out the material than it did to create the cushions, so I’m hoping to suffice with just the outline of the steps I followed 🙂
Step 1 -Spend an entire afternoon in the fabric section of the local Ben Franklin’s, agonizing over the selection -so many choices!
Step 2 -Decide that you are going to cover the seats themselves with your favorite old standby, soft canvas painter’s drop-cloth (you can pick that up at Home Depot later), which leaves only the fabric for the two back-rest cushions and the massive 7 ½ foot back wall cushion to be chosen.
Step 3 -Identify a fabric that closely matches the creamy, oatmeal color of laundered painter’s drop-cloth, so that you can use it to tone match your other two needed fabrics. (For the canvas drop-cloth, I always use whatever is cheapest at Home Depot. Once washed and dried, canvas drop-cloth is a soft, heavy, creamy material that works well for many applications -seat covers, curtains, et cetera)
Step 4 -Decide that one of the fabrics absolutely has to be a matching cream & sand ticking, just because you love nautical ticking so much, and besides, Myrtle wants to go to the Beach.
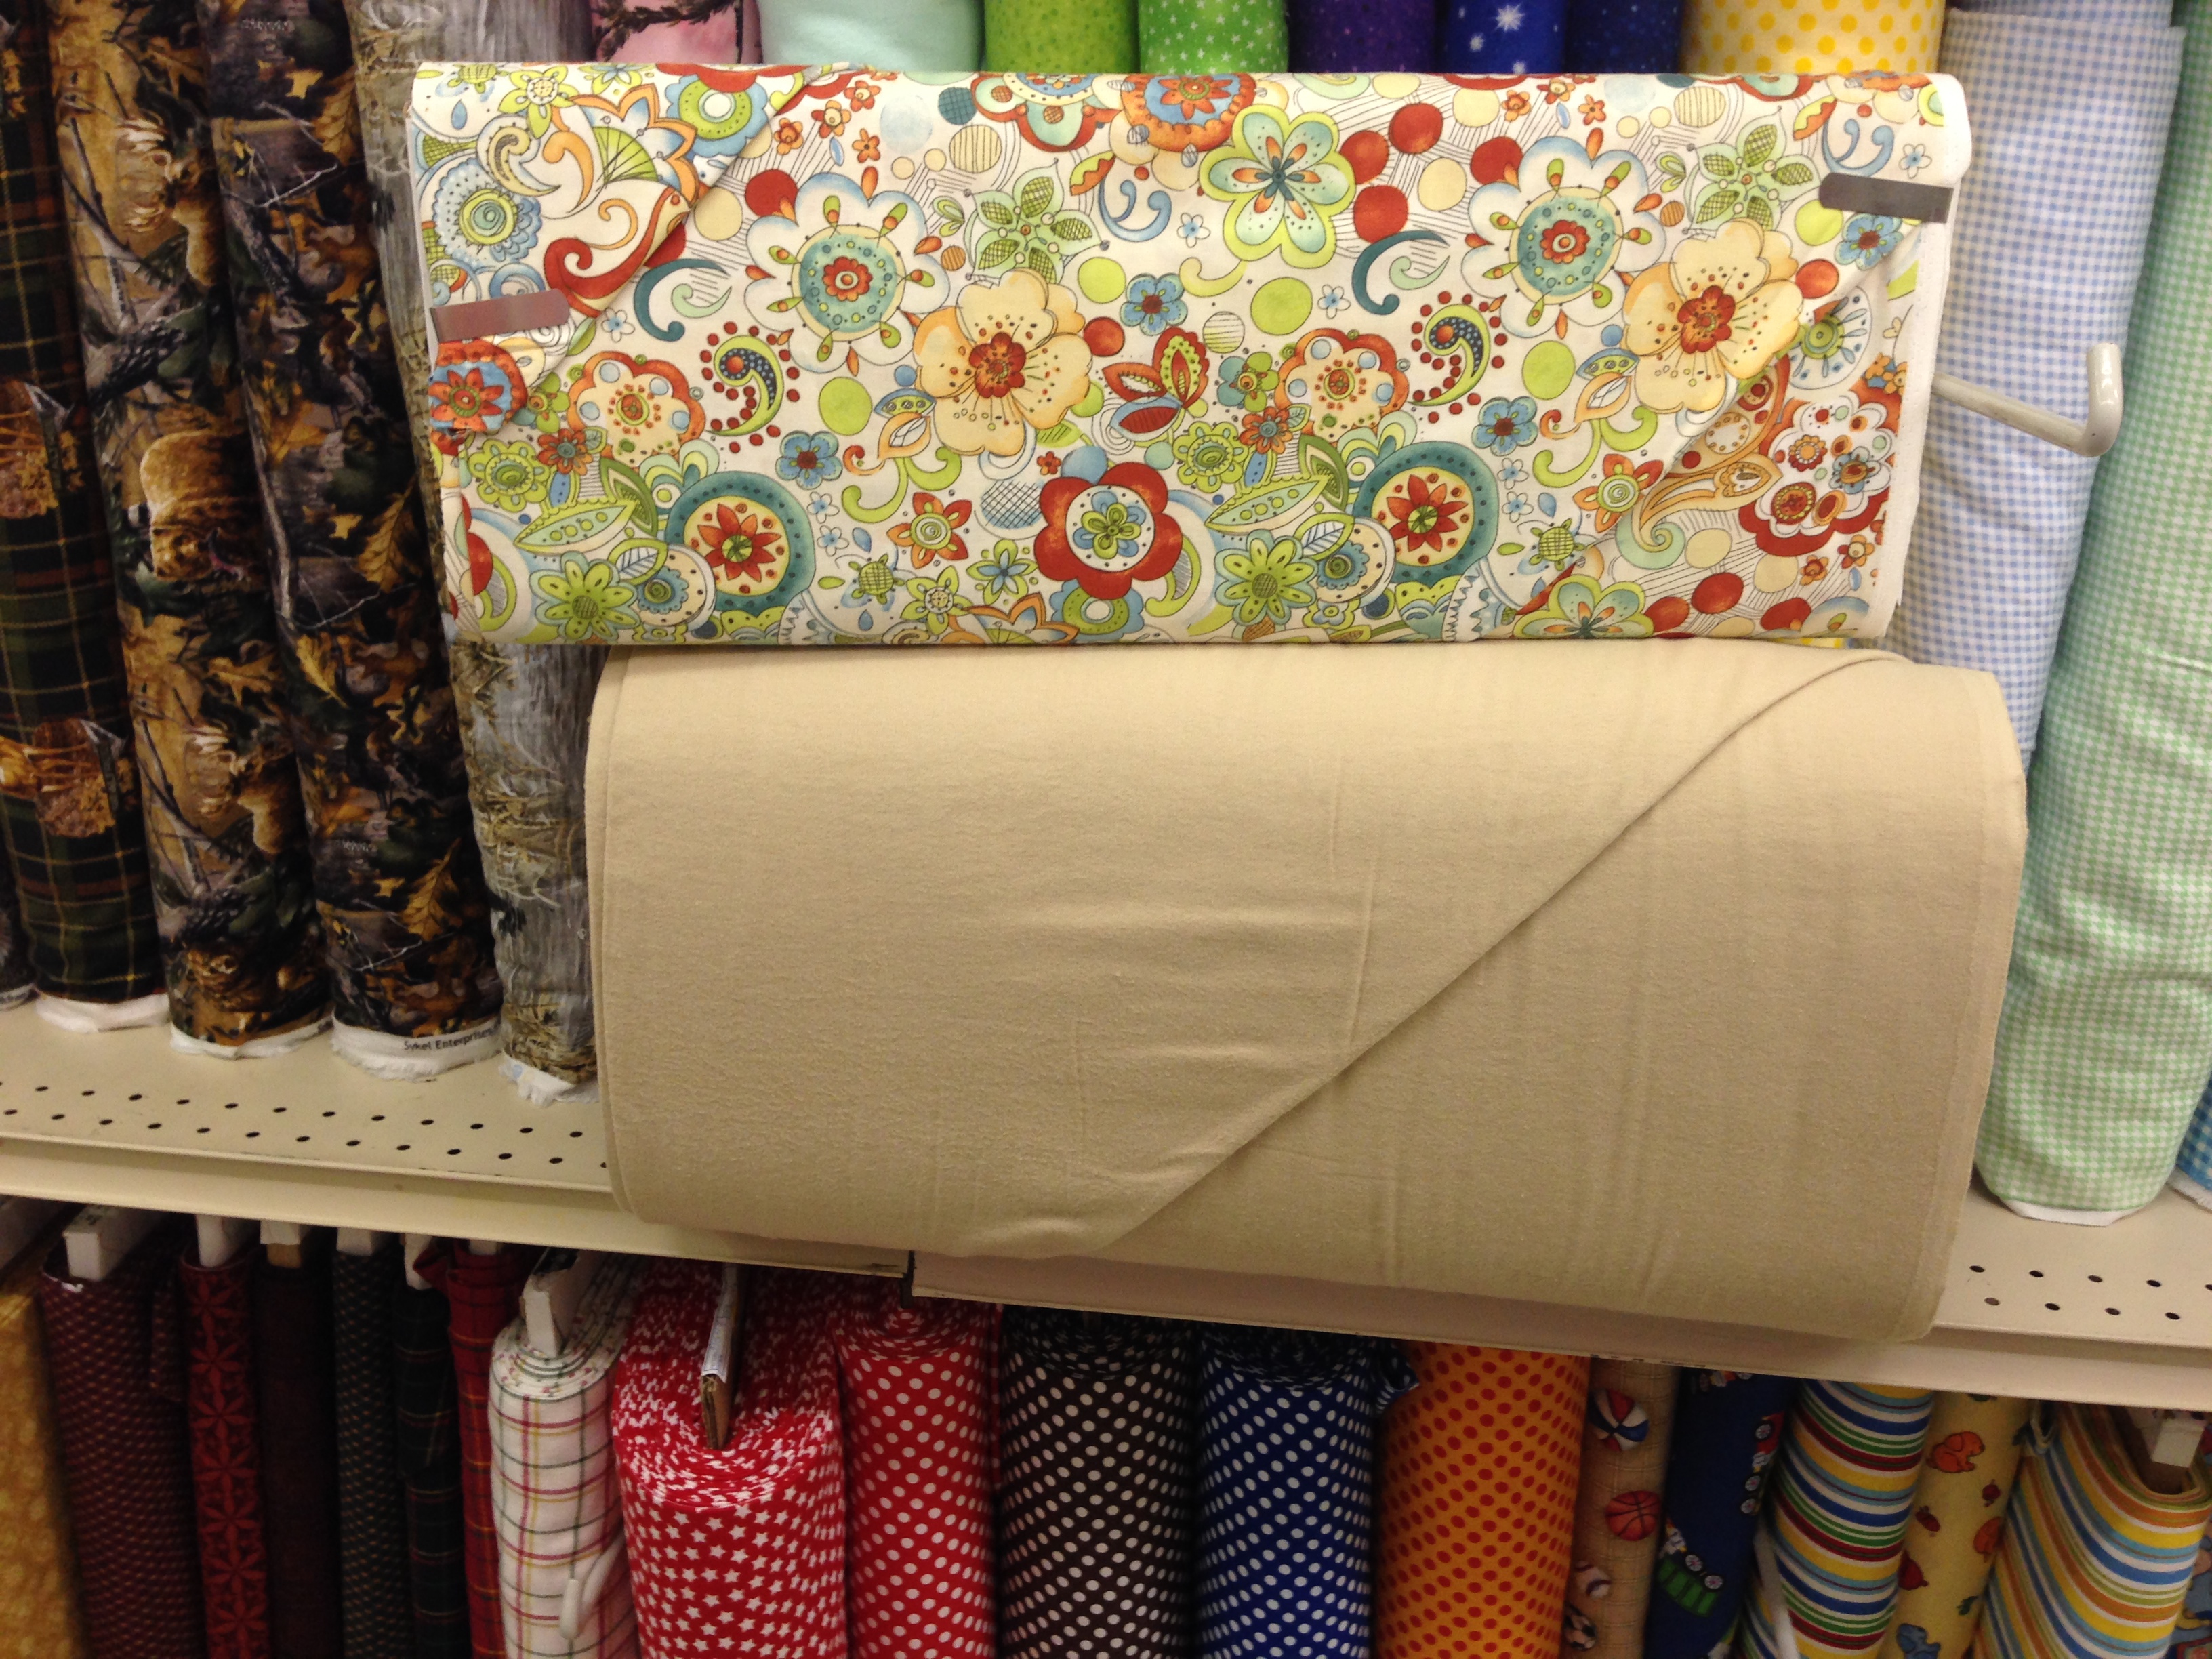 Step 5 -Stand for an hour in the fabric aisle, staring at a vintage design floral lying on top of your drop-cloth look alike fabric, trying to decide if you can pull it off with the striped ticking. Ignore the saleslady when she asks you for the fifth time if you need assistance -you’ve already told her four times that you’re fine, thank-you- people need to just let you think! For an hour or more!
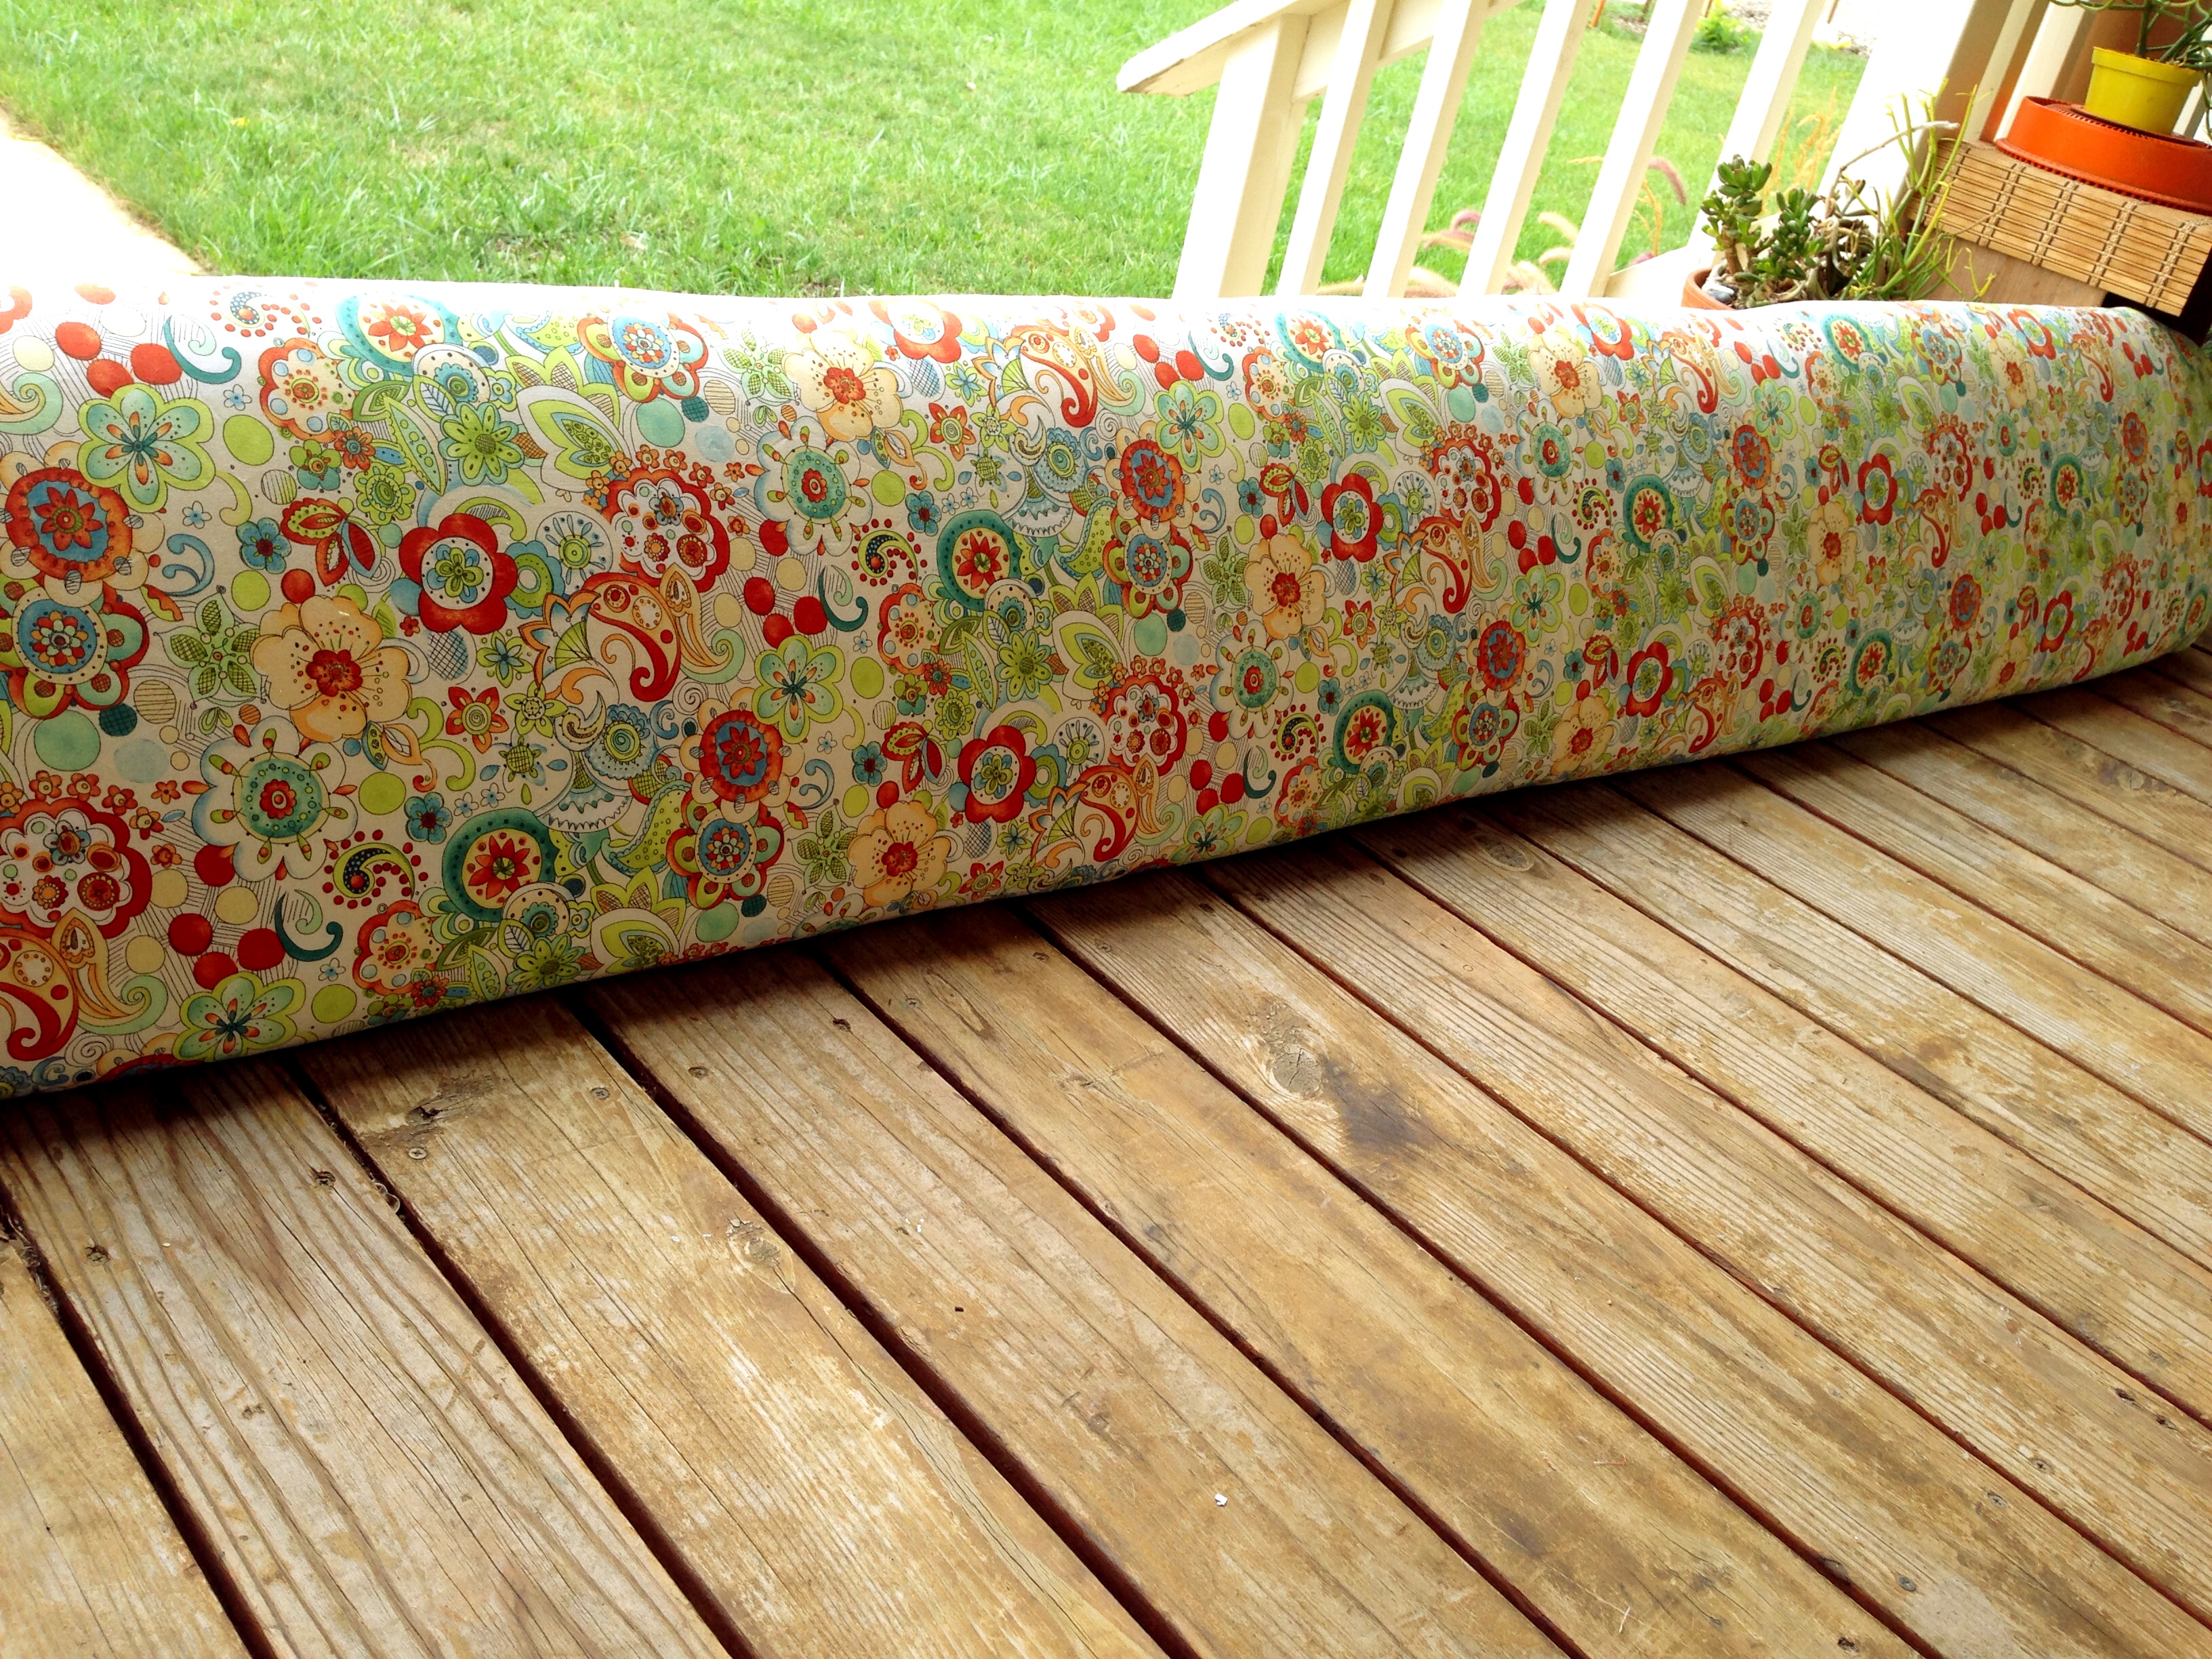
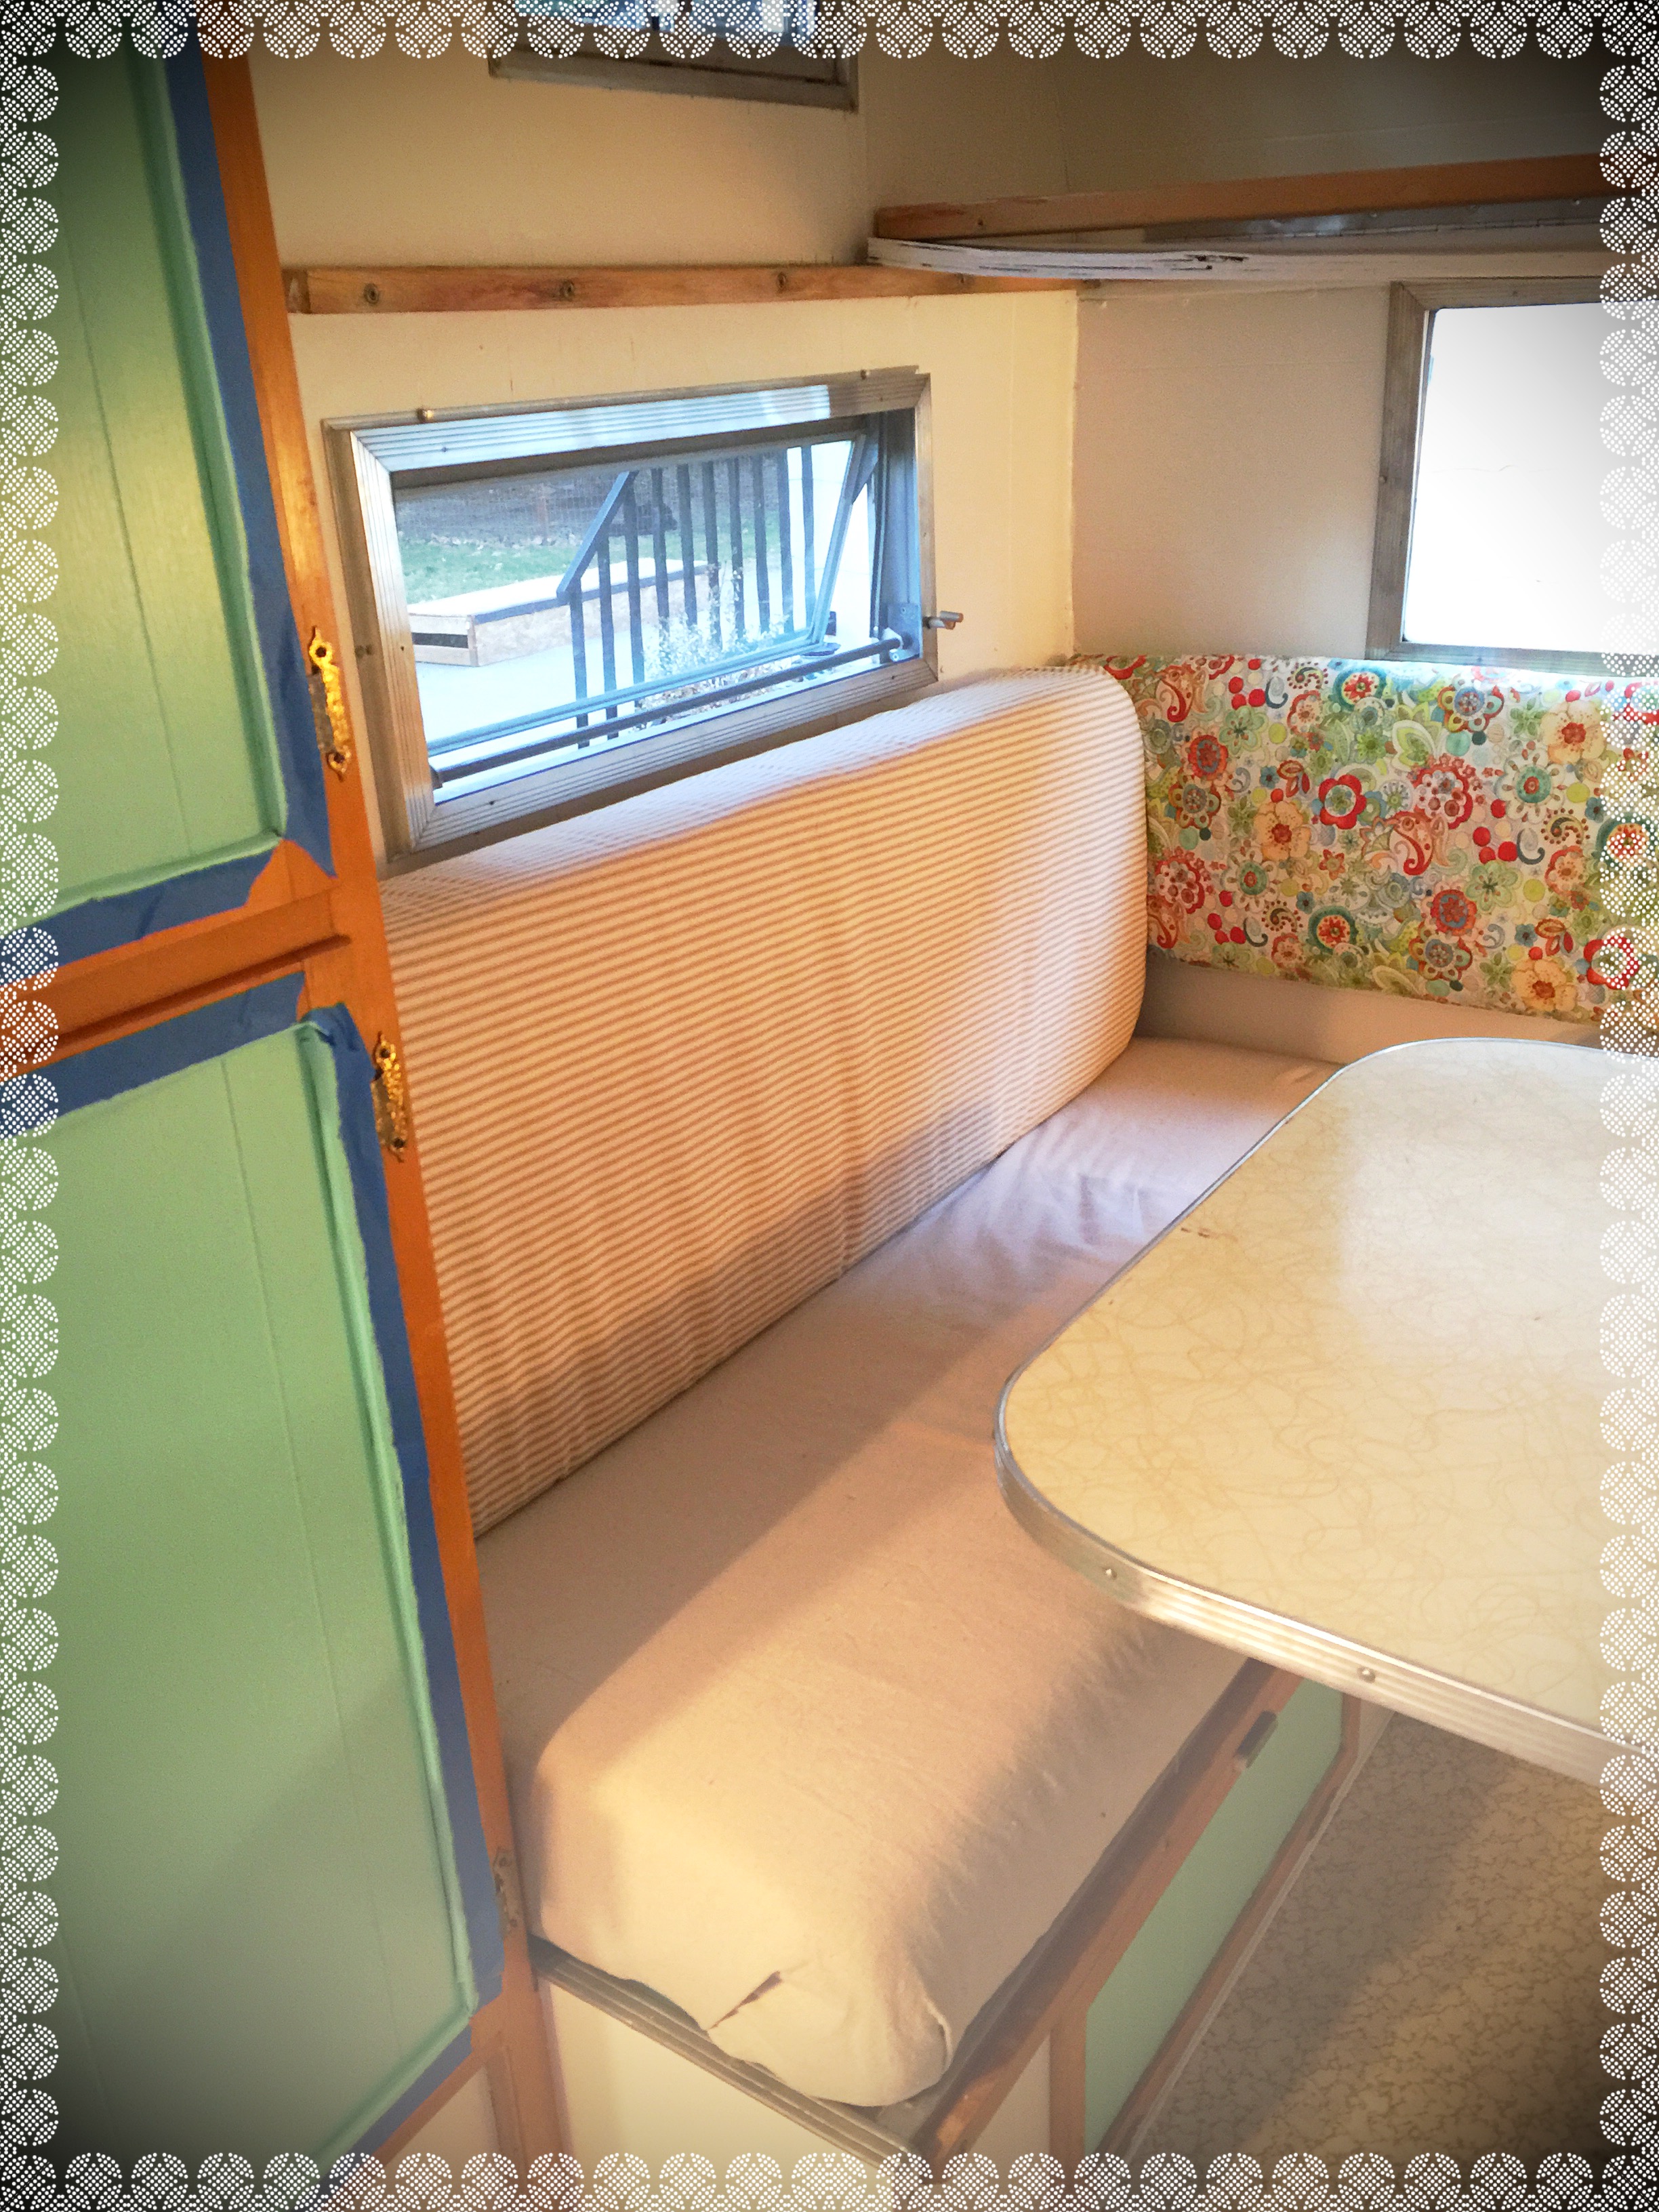
Step 6 -Finish up these no-sew cushions by cutting thin plywood sheets (I think I used 1/8″) the same size as your cushions, only just a bit smaller so that you have a complete foam edge, and no sharp wood edges protruding. Cut the material so that it will completely cover the cushion, with enough fabric to wrap around to the wood back. Lay the material down first, then lay some nice fluffy quilt batting down in the size of your cushion, followed by the cushion, and lastly, lay the wood piece on top. Pull the fabric taut (but not so tight it will rip apart when sat on!) and staple gun to the board. Pay special attention to the pulling / folding around the corners, the neater it looks at the corners, the better. Kind of like wrapping a gift -make those corners look tidy 😉
Step 7 -Take lots of pictures of your new camper cushions, that frankly surprise even you with how damn good they look (really ? with a staple gun??)
I’m going to jump ahead in time, here, so that I can post the photos of the cushions once I placed them back into Myrtle. We were all prepared to paint Myrtle’s exterior in late August, when we were hit by a week of summer rain storms. I completed the cushions during this time, but did not yet have Myrtle’s interior ready. They actually hung out in my house until early November, I believe, when the rear interior of the camper was completed enough for them to go back in. Regardless, I’m going to fast-forward in time just enough to post those pictures here. 🙂


This photo shows the rear dinette in various states of the renovation. Ignore the painter’s tape still hanging around the moldings 😉
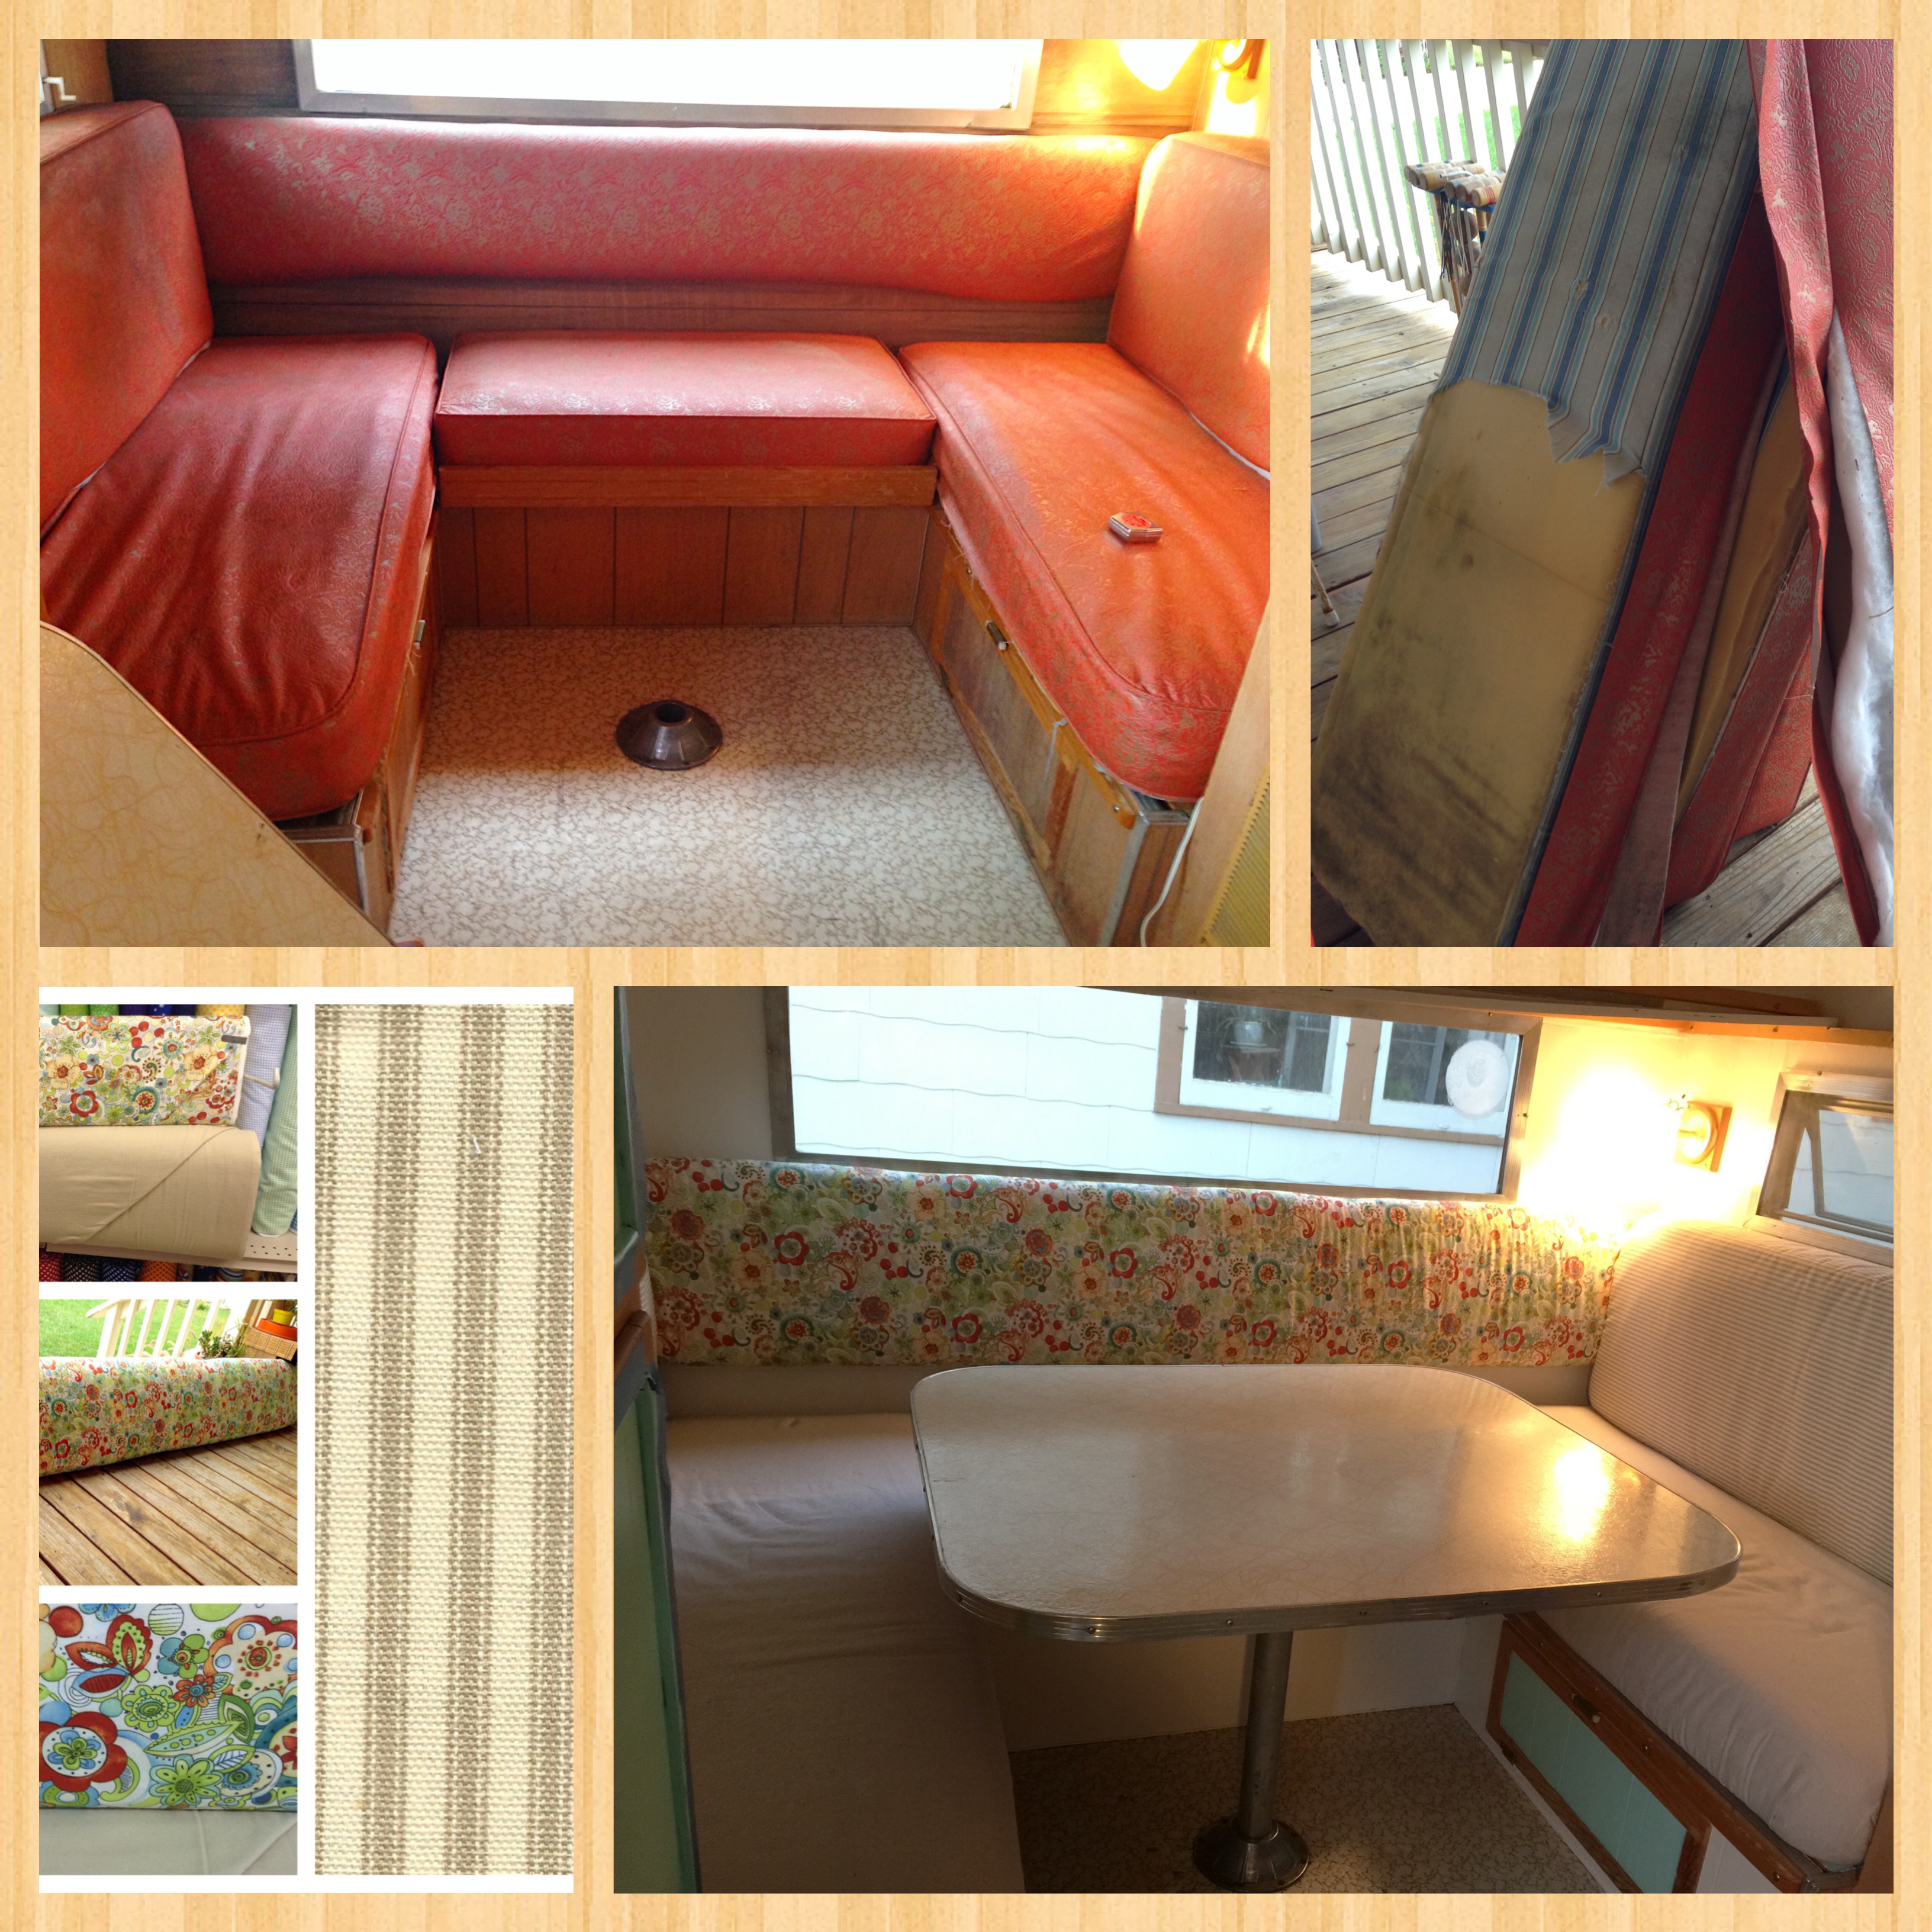
A ‘Before’ & ‘After’ compilation

The rear interior is not quite complete -I still have work to do on the upper bunk (which I removed half of, and am re-purposing as a shelf), new flooring still needs to be installed, some shelves, curtains, et. cetera still to come -but I really needed to get the cushions out of my house; they had been taking up the entire dining room for over a month 🙂
I spent a good deal of time contemplating how I was going to re-hang the back wall cushion. It had originally been screwed to the wall from the outside of the wood frame -so literally installed before the aluminum skin was added. I knew there had to be some sort of hanging mechanism to attach something large like this to a wall, I just didn’t know what such a hanger would be called. For anyone else who isn’t already in the know -it’s called a French Cleat hanger 🙂

H&M ‘tea towel’ style throw pillow cover -$5.99!
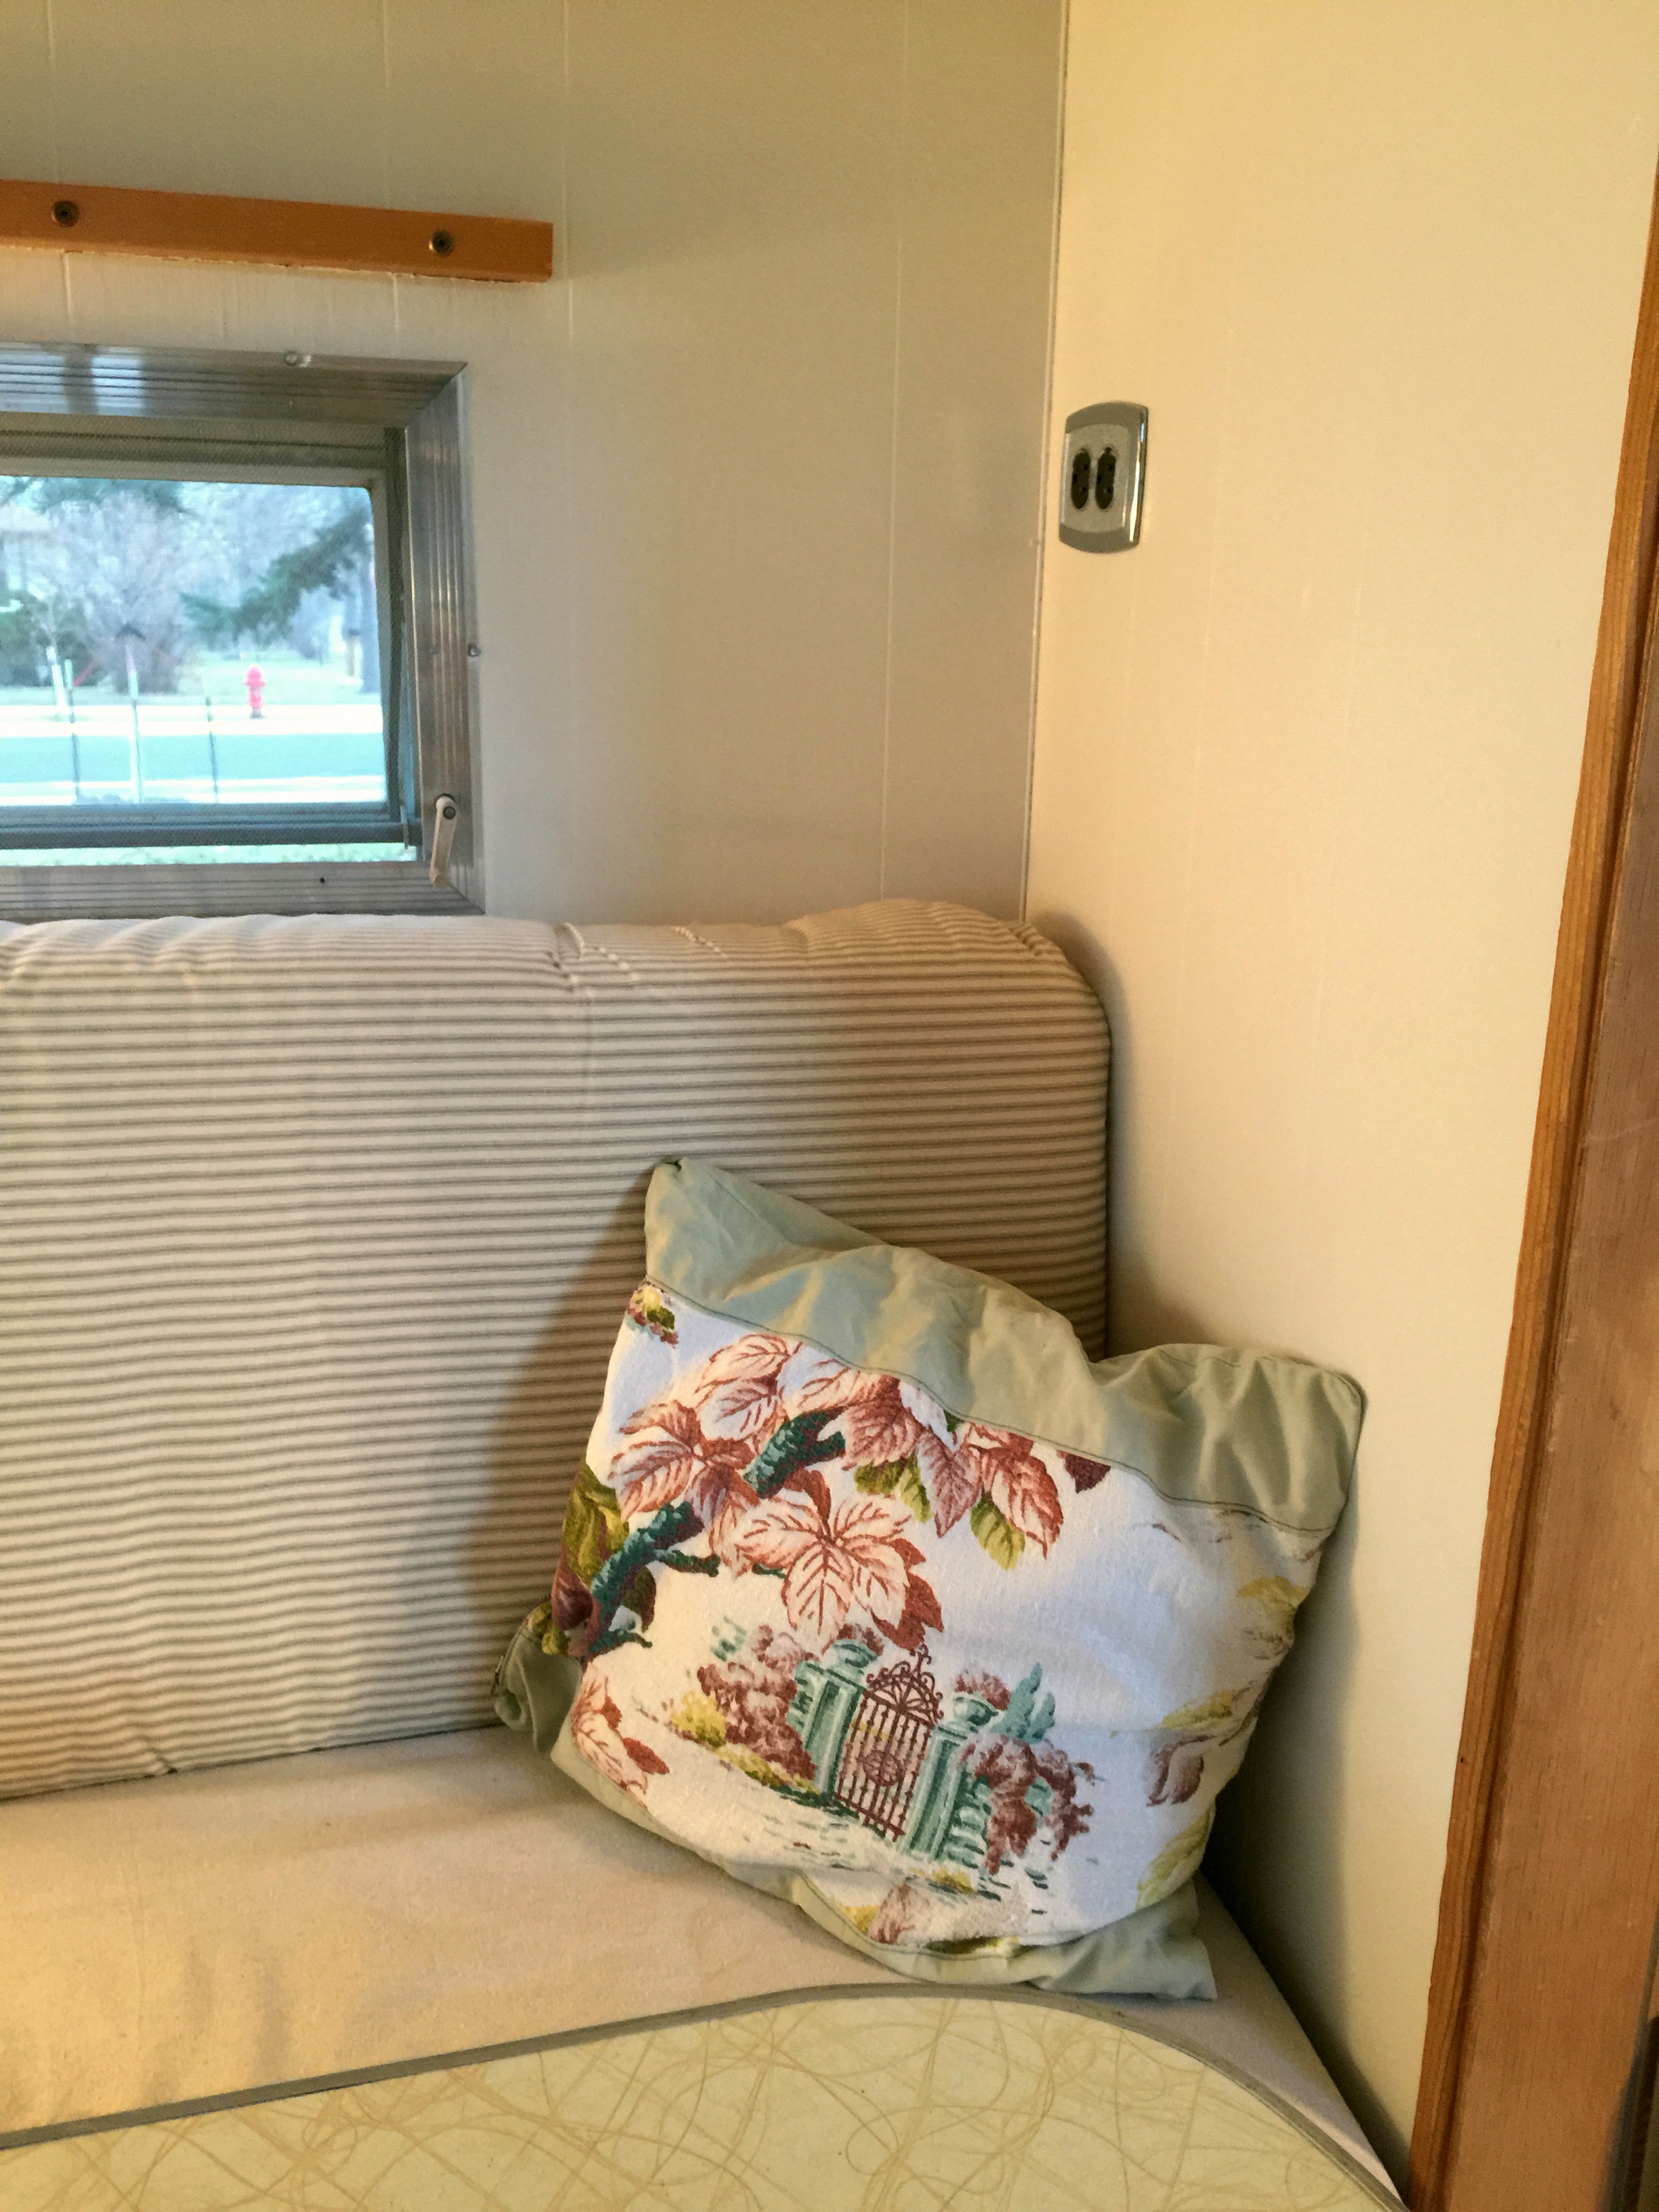
Vintage barkcloth throw pillow cover
Next entry -Myrtle’s exterior paint job: in ’60’s era Turquoise & Atomic Tangerine!

Love what you did with your cushions! Great job! I also have a U-Shaped dinette like yours and cannot sew either, so I will be doing the same treatment to mine.
This is a totally naive newbie question, but how do you lower the table to make it into a bed? Hubby swears that there is no way to do this. My 69 Shasta Stratoflyte had to be completely gutted as she was a rot bucket (but hey, we only paid $350 for her!) so she’s being rebuilt and we’ll be working on the dinette in the next couple of weeks. Thanks!
Hi Kristina! In my RoadRunner, the table can not be lowered, it has to be removed by pulling the table stand from the floor. Once the table is removed, there is a hinged, fold-out board that is located under the back rear seat cushion -this board is pulled out to form the bed platform 🙂
Thanks for sharing. I am going to use your method to re cover my cushions as well. Upholstery works is very expensive. I deodorized my cushions (any they were funky) my spray a fifth of Vodka on them and letting them stay out in the sun for 3 days. I had read about the Vodka on another blog and sure enough it works. On fifth of Vodka per 4 cushions. I look forward to following your blog. 🙂
Vodka! I wish I’d known 🙂
Great solution to the problem. Well done.
My husband and I stumbled across your blog this morning, and I’m so excited. We bought a Roadrunner trailer last year, and we’re getting ready to start her rehab. It’s hard to find info on these cuties. You’re doing a great job….thanks for posting all of this!! Kris
Thank you! I’m so close to having her completed, if winter would just STOP so I could complete the interior -it’s too cold for paint to cure, and I’m pretty sure leaving the heater on in Myrtle unattended for long periods is not the best idea 😉 What year is your RoadRunner?
We really aren’t sure what year our RoadRunner is (Silver Bombshell). The people we bought her from had the title, but they year on it was 2000….I think they had to apply for a new title and since it wasn’t known, they just put the year they purchased it. Ha! She has the stickers, the quilted piece around the front window, and the step with the roadrunner logo. I have to look at yours again, but she’s a pretty close match!
Hey there- I just bought the same trailer and came across your blog looking for information on it. Great job on the renno, can’t wait to gussie up my own rig. Do you know what the weight of it is or have any of the original specs?
We have all of her original paperwork, as far as I know, but weight & particulars are not specified anywhere. We’ve never had her on the scale, but guesstimate she’s around 1,200 pounds.. 🙂
do you have a facebook page I just purchased a 1968 Roadrunner
https://www.facebook.com/pages/Mid-Century-Myrtle/969650213054348?ref=bookmarks